How to Create New Environments in Anaconda - EASY!
Introduction
Using Anaconda Environments can save you a serious amount of time when it comes to python programming. In this short tutorial, I explain the concept of environments and why we need to use them. I have broken it down into four simple steps in this post. However, I highly recommend watching my video tutorial below. I also give a short demonstration of Jupyter Notebook.
Please Subscribe!
Installing Anaconda - Step 1
You will need to install Anaconda to follow along with this tutorial. I recommend you download the Python 3.7 version. If you already have Anaconda installed, go to step 2.
Anaconda can be downloaded here:
https://www.anaconda.com/distribution/

Running Anaconda - Step 2
After installation has completed, search for anaconda navigator in the windows search bar. We're going to be using the anaconda prompt, but first you will need to run anaconda navigator. The navigator goes through a setup process upon startup. When anaconda navigator launches successfully, close it. Now open Anaconda Prompt. You should see a command line tool. This is what we'll be using for this tutorial.

Creating and Activating A New Environment - Step 3
Creating a new conda environment prevents conflicts between environment libraries. To put it simply, creating a new environment stops you having to constantly install and uninstall dependencies every time you want to switch between projects. Instead, you can just switch environments. That way, your environment has it's own kernel along with it's own libraries / dependencies.
You can create a new environment with the following command. After -n is where we specify the environment name. This is followed by the version of python we want to install.

We then need to activate our environment. The commands differ slightly between Windows and Mac. After entering the command, you should see that (base) has now changed to (your environment name). This means that any commands entered from this point on will be executed within that environment.
Windows:

Mac:
If you want to know your environment directory, you can find it via your OS file system. For example my file path looks like this.
Installing a Python Kernel - Step 4
We need to create a Python Kernel inside of our environment so that we can run our code. Anaconda used to create a kernel by default. However, this is no longer the case, so we must do it manually.
First we need install ipykernel:

We now need to install a kernel. Again, make sure you have activated your environment, (gputest), in this case. To install a kernel, enter the following command. The variables after '--name' and display-name will need to be set to the name of your environment. If entered correctly, you'll see a response 'Installed kernelspec'.
Jupyter Notebook Setup - Step 5
After creating a new environment, we essentially start from scratch with an empty environment. Therefore, to use Jupyter Notebook we will need install it via Anaconda. Again, make sure you have activated your new environment.
After installing Jupyter, we can now launch Jupyter Notebook with the following command:
After entering the command above, a Jupyter notebook server should launch via your default browser. Using the notebook server file system, navigate to your environment directory. For example:
Which also resembles this directory in your system:
After navigating to the directory, create a new notebook via the server and select the kernel you installed previously. An empty notebook should open.

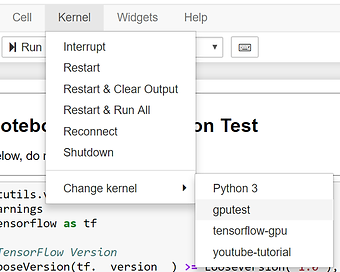
Make sure you are using the correct kernel!
This is where most people go wrong. After creating a new notebook, look at the top right of the screen. Ensure you have the correct kernel selected (i.e. the kernel we just installed to our environment.) If your kernel is not correct, you change kernel manually as shown below.

Thanks for reading.
Happy Coding :)
Best Python / Machine Learning Books

thehardwareguy
Did you find this helpful?
Kindly consider supporting me.
SEO Keywords
anaconda environment explained, ipykernel, install anaconda, jupyter kernel, adding kernel to jupyter, anaconda virtual environment, jupyter no kernel, conda environments, conda environments explained, creating conda environments, ipykernel tutorial, jupyter notebook kernel, python 3 kernel, python kernel, what are anaconda environments, pip install ipykernel, activate conda environments, activate anaconda environment, conda environment windows, ipykernel not there, how to create an anaconda environment, understanding anaconda environments, why do we need anaconda environments